
StipendTracker
How to use it

From zero to tracking in two minutes

Follow along with these short clips. Every step uses the real app, with made-up numbers.

1

Set up your budget

The first time you open StipendTracker you will see a short setup. Choose your currency, enter any savings you already have as your starting Baller Budget, and type a monthly budget for each category. The total at the top adds up as you type, so you can see your whole monthly budget at a glance.

  • Turn on Fixed bill for things you pay in one go, like rent.
  • Add, rename or archive categories any time in Settings.
stipendtracker
2

Add what you spend

Pick a category, type the amount and press Enter. A name is optional but handy later. Bought something yesterday? Change the date. Made a mistake? Undo last entry takes it back.

  • Paid in another currency? Tap € or $ next to the amount and it converts at that day's exchange rate.
  • You get a gentle heads-up if an entry puts a category behind pace.
  • The app is in English for now, so button names appear in English.
stipendtracker
3

Read the pace bars

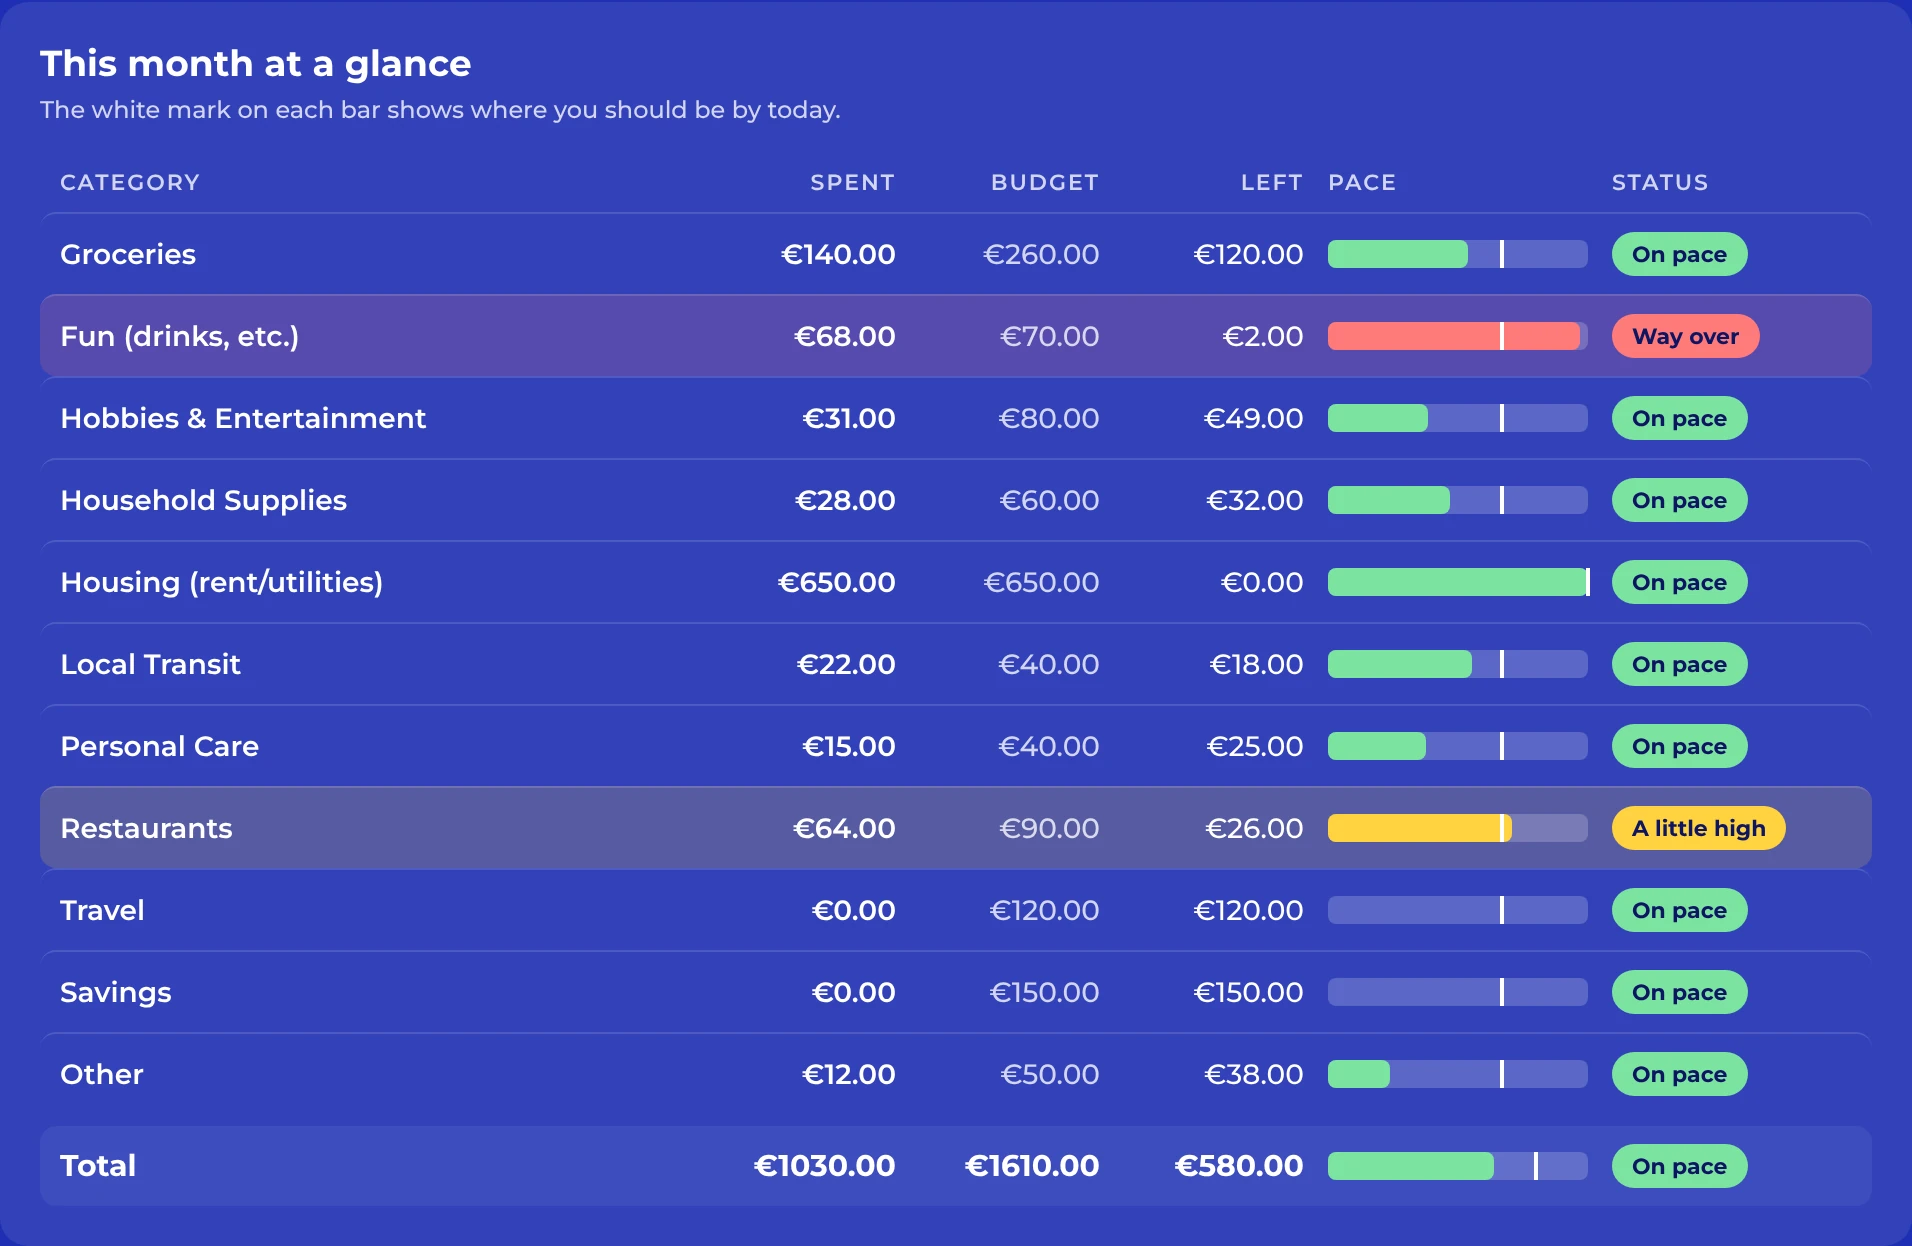
Each bar shows what you have spent, and the white mark shows where you should be by today. Green means on pace, yellow a little high, red way over. For the first three days of a month only going over a full budget is flagged, so early bills do not set off false alarms.

  • Fixed bills like rent are measured against their full amount.
  • Budget changes apply from this month on. Past months keep theirs.
stipendtracker
This month at a glance: each category with a pace bar and status
4

Use your Baller Budget

Whatever you do not spend in a finished month rolls into your Baller Budget. Add your own funds too, like a gift or a bonus, with Manage. When you want to spend freely, pick Baller Budget as the category.

  • If it ever drops below zero, the card turns red.
  • Every deposit and spend is listed, and you can delete any of them.
The Baller Budget window with balance, surplus and funds added
5

Look back at any month

Budget History lists every month. Click one to see a ring chart of where the money went, with over-budget categories flagged yellow or red. Each month remembers the budgets it had, so changing budgets later never rewrites the past.

  • Hover a category to highlight its slice.
  • Spending by Category in the menu lists every entry in a category.
stipendtracker
6

Import your bank statement

You do not need to enter every little transaction one at a time. Export your account movements as a PDF from Santander, choose Import PDF, and StipendTracker finds the purchases for you. Review them, change any category, and tick Remember so that store is sorted automatically next time. Then click Import.

  • Purchases you already imported are skipped.
  • Incoming payments are skipped. Only spending is imported.
  • Imported by mistake? Undo import removes the whole batch.
  • The PDF is read on your device. It is never uploaded anywhere.
stipendtracker
7

Keep a backup

Your data lives only on your device. In Settings, Save backup file downloads a copy you can keep somewhere safe. Restore from backup brings it back, even on another device.

  • Saving one after each month takes ten seconds.
  • Web and Mac versions keep separate data. Nothing syncs between them.
The Backup section in Settings
Tip: install the web app on your phone or computer and it opens like a normal app, even with no internet. See the install guide.

That is the whole app. Give it a try.

Questions? The FAQ has answers, and you can always email me.